Sunday 31 August 2014

Custom List View Example in Android


CUSTOM LIST VIEW EXAMPLE IN ANDROID :


In this tutorial I will show you how to make a custom list view in which you can set your image and text views.


To make this type of list view you need to make your own adapter which will inflate the data on to the list view.

First create new project in Eclipse, File => New => Other => Android Application Project and fill the required details. I am giving the name of package as com.javalanguageprogramming.customlistviewdemo. You can change the name of the package.


Now copy the code shown below into activity_main.xml which is set up to show the list view.

    
 <LinearLayout xmlns:android="http://schemas.android.com/apk/res/android"  
   xmlns:tools="http://schemas.android.com/tools"  
   android:layout_width="match_parent"  
   android:layout_height="match_parent"  
   tools:context="${packageName}.${activityClass}" >  
   
   <ListView  
     android:layout_width="fill_parent"  
     android:layout_height="wrap_content"  
     android:id="@+id/customlist"  
     />  
   
 </LinearLayout>  


Make a new xml file and name it as custom_list.xml which is used to show each list item. It is actually a list view child class.


Code for custom_list.xml is shown below :

 <?xml version="1.0" encoding="utf-8"?>  
   
 <LinearLayout xmlns:android="http://schemas.android.com/apk/res/android"  
   android:layout_width="match_parent"  
   android:layout_height="match_parent"  
   android:orientation="horizontal" >  
   
   <ImageView  
     android:id="@+id/imageView1"  
     android:layout_width="100dp"  
     android:layout_height="wrap_content" />  
   
   <LinearLayout  
     android:layout_width="match_parent"  
     android:layout_height="match_parent"  
     android:orientation="vertical" >  
   
     <TextView  
       android:id="@+id/headingText"  
       android:layout_width="wrap_content"  
       android:layout_height="wrap_content"  
       android:layout_gravity="center"  
       android:layout_marginTop="10dp"  
       android:textSize="20sp"  
       android:textStyle="bold" />  
   
     <TextView  
       android:id="@+id/subHeadingText"  
       android:layout_width="wrap_content"  
       android:layout_height="wrap_content"  
       android:layout_gravity="center"  
       android:layout_marginTop="10dp" />  
   </LinearLayout>  
   
 </LinearLayout>  


Copy the images shown below in res => drawable folder


Now copy the code of MainActivity.java given below :

 package com.javalanguageprogramming.customlistviewdemo;  
   
 import android.app.Activity;  
 import android.content.Context;  
 import android.os.Bundle;  
 import android.view.LayoutInflater;  
 import android.view.View;  
 import android.view.ViewGroup;  
 import android.widget.AdapterView;  
 import android.widget.AdapterView.OnItemClickListener;  
 import android.widget.BaseAdapter;  
 import android.widget.ImageView;  
 import android.widget.ListView;  
 import android.widget.TextView;  
 import android.widget.Toast;  
   
   
 public class MainActivity extends Activity {  
   
      ListView listView;  
      CustomListAdapter adapter;  
      //array of all headers  
      String[] headingList = {"Angel Cake",   
                "BattenBerg",   
                "CupCake",   
                "Donut",   
                "Eclair",   
                "Foryo",   
                "Gingerbread",   
                "HoneyComb",   
                "IceCream Sandwich",   
                "Jelly Bean",   
                "Kitkat"  
                };;  
      @Override  
      protected void onCreate(Bundle savedInstanceState) {  
           super.onCreate(savedInstanceState);  
           setContentView(R.layout.activity_main);  
             
           //find the list view from xml file  
           listView = (ListView)findViewById(R.id.customlist);  
             
             
           //array of all sub headings  
           String[] subHeadingList = {"Android 1.0",   
                               "Anroid 1.1",   
                               "Android 1.5",   
                               "Android 1.6",   
                               "Android 2.0/2.1",   
                               "Android 2.2",   
                               "Android 2.3",   
                               "Android 3.0",   
                               "Android 4.0",   
                               "Android 4.1",   
                               "Android 4.4"  
                               };  
             
           //array of all images  
           int[] imgList = {R.drawable.android1,   
                     R.drawable.android2,   
                     R.drawable.android3,   
                     R.drawable.android4,   
                     R.drawable.android5,   
                     R.drawable.android6,   
                     R.drawable.android7,   
                     R.drawable.android8,   
                     R.drawable.android9,   
                     R.drawable.android10,   
                     R.drawable.android11  
                     };  
             
             
           //call the custom adapter  
           adapter = new CustomListAdapter(headingList, subHeadingList, imgList, MainActivity.this);  
           // set the custom adapter  
           listView.setAdapter(adapter);  
             
           // set the list item on click listener  
           listView.setOnItemClickListener(new OnItemClickListener() {  
   
                @Override  
                public void onItemClick(AdapterView<?> parent, View view,  
                          int position, long id) {  
                     // TODO Auto-generated method stub  
                     switch(position){  
                     case 0 :  
                          Toast.makeText(MainActivity.this, headingList[(int) adapter.getItemId(position)] + " is clicked", Toast.LENGTH_LONG).show();  
                          break;  
                            
                     case 1 :  
                          Toast.makeText(MainActivity.this, headingList[(int) adapter.getItemId(position)] + " is clicked", Toast.LENGTH_LONG).show();  
                          break;  
                            
                     case 2 :  
                          Toast.makeText(MainActivity.this, headingList[(int) adapter.getItemId(position)] + " is clicked", Toast.LENGTH_LONG).show();  
                          break;  
                            
                     case 3 :  
                          Toast.makeText(MainActivity.this, headingList[(int) adapter.getItemId(position)] + " is clicked", Toast.LENGTH_LONG).show();  
                          break;  
                            
                     case 4 :  
                          Toast.makeText(MainActivity.this, headingList[(int) adapter.getItemId(position)] + " is clicked", Toast.LENGTH_LONG).show();  
                          break;  
                            
                     case 5 :  
                          Toast.makeText(MainActivity.this, headingList[(int) adapter.getItemId(position)] + " is clicked", Toast.LENGTH_LONG).show();  
                          break;  
                            
                     case 6 :  
                          Toast.makeText(MainActivity.this, headingList[(int) adapter.getItemId(position)] + " is clicked", Toast.LENGTH_LONG).show();  
                          break;  
                            
                     case 7 :  
                          Toast.makeText(MainActivity.this, headingList[(int) adapter.getItemId(position)] + " is clicked", Toast.LENGTH_LONG).show();  
                          break;  
                            
                     case 8 :  
                          Toast.makeText(MainActivity.this, headingList[(int) adapter.getItemId(position)] + " is clicked", Toast.LENGTH_LONG).show();  
                          break;  
                            
                     case 9 :  
                          Toast.makeText(MainActivity.this, headingList[(int) adapter.getItemId(position)] + " is clicked", Toast.LENGTH_LONG).show();  
                          break;  
                            
                     case 10 :  
                          Toast.makeText(MainActivity.this, headingList[(int) adapter.getItemId(position)] + " is clicked", Toast.LENGTH_LONG).show();  
                          break;  
                            
                     case 11 :  
                          Toast.makeText(MainActivity.this, headingList[(int) adapter.getItemId(position)] + " is clicked", Toast.LENGTH_LONG).show();  
                          break;  
                     }  
                       
                }  
           });  
      }  
        
      private class CustomListAdapter extends BaseAdapter{  
   
           private LayoutInflater mInflater;  
           private String[] headingList;  
           private String[] subHeadingList;  
           private int[] imgList;  
             
           public CustomListAdapter(String[] headingList, String[] subHeadingList, int[] imgList, Context context){  
                mInflater = LayoutInflater.from(context);  
                this.headingList = headingList;  
                this.subHeadingList = subHeadingList;  
                this.imgList = imgList;  
           }  
             
           @Override  
           public int getCount() {  
                // TODO Auto-generated method stub  
                return headingList.length;  
           }  
   
           @Override  
           public Object getItem(int position) {  
                // TODO Auto-generated method stub  
                return headingList[position];  
           }  
   
           @Override  
           public long getItemId(int position) {  
                // TODO Auto-generated method stub  
                return position;  
           }  
   
           @Override  
           public View getView(int position, View convertView, ViewGroup parent) {  
                // TODO Auto-generated method stub  
                try{  
                     final ViewHolder holder;  
                if(convertView == null){  
                     convertView = this.mInflater.inflate(R.layout.custom_list, parent, false);  
                     holder = new ViewHolder();  
                     holder.image = ((ImageView)convertView.findViewById(R.id.imageView1));  
                     holder.heading = ((TextView)convertView.findViewById(R.id.headingText));  
                     holder.subHeading = ((TextView)convertView.findViewById(R.id.subHeadingText));  
                     convertView.setTag(holder);  
                }  
                else{  
                     holder = (ViewHolder)convertView.getTag();  
                }  
                holder.image.setBackgroundResource(imgList[position]);  
                holder.heading.setText(headingList[position]);  
                holder.subHeading.setText(subHeadingList[position]);  
                }catch(Exception e){  
                     e.printStackTrace();  
                     return null;  
                }  
   
                return convertView;  
           }  
   
             
      }  
      static class ViewHolder{  
           ImageView image;  
           TextView heading;  
           TextView subHeading;  
      }  
 }  


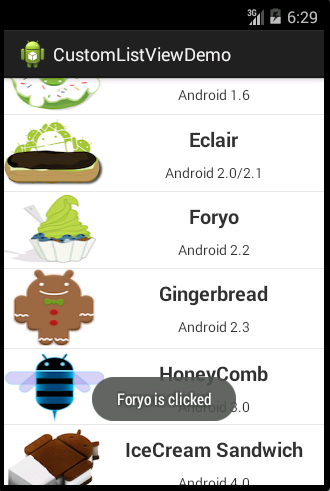
This activity first stores all the headings, subheadings and image ids in arrays which are further used to set up our own custom adapter.

In custom adapter we used a ViewHolder which is nothing but a static class and have 2 TextViews and 1 ImageView and is responsible for inflating these elements on the same list item so that we will not go out of memory if a list view contain 100’s of list items but in this case only 11 list items are present, so you may or may not use a view holder.


In getView method we are inflating our text views and an image by LayoutInflater.
Read more

Simple List View Example in Android


SIMPLE LIST VIEW EXAMPLE IN ANDROID :


In this tutorial I will demonstrate you how to make a simple list view using Array Adapter and simple list item which is already present in android run time environment.


Create a new project in eclipse and give it a name and package name. I am giving name of the project as ListViewDemo and package name as com.listview.listviewdemo.


In activity_main.xml (lies in res => layout) copy the code shown below :

 <LinearLayout xmlns:android="http://schemas.android.com/apk/res/android"  
   xmlns:tools="http://schemas.android.com/tools"  
   android:layout_width="match_parent"  
   android:layout_height="match_parent"  
   >  
   
   <ListView  
     android:layout_width="fill_parent"  
     android:layout_height="wrap_content"  
     android:id="@+id/simplelist"  
     />  
   
 </LinearLayout>  


In the above code we defined a ListView in xml file and give it id as simplelist.

Now in MainActivity.java copy the code shown below :

 package com.listview.listviewdemo;  
   
 import android.app.Activity;  
 import android.os.Bundle;  
 import android.view.View;  
 import android.widget.AdapterView;  
 import android.widget.AdapterView.OnItemClickListener;  
 import android.widget.ArrayAdapter;  
 import android.widget.ListView;  
 import android.widget.Toast;  
   
 public class MainActivity extends Activity {  
   
      ListView listView;  
      @Override  
      protected void onCreate(Bundle savedInstanceState) {  
           super.onCreate(savedInstanceState);  
           setContentView(R.layout.activity_main);  
             
           //find the list view from xml file  
           listView = (ListView)findViewById(R.id.simplelist);  
             
           // make an array which stores the list items  
           String[] myList = {"List Item1",   
                     "List Item2",   
                     "List Item3",   
                     "List Item4",   
                     "List Item5",   
                     "List Item6",   
                     "List Item7",   
                     "List Item8"};  
             
           //array adapter takes 4 parameters, context, layout reference, id of text view, array of items  
           ArrayAdapter<String> adapter = new ArrayAdapter<String>(this, android.R.layout.simple_list_item_1, android.R.id.text1, myList);  
           listView.setAdapter(adapter);  
             
           // set the list item on click listener  
           listView.setOnItemClickListener(new OnItemClickListener() {  
   
                @Override  
                public void onItemClick(AdapterView<?> parent, View view,  
                          int position, long id) {  
                     // TODO Auto-generated method stub  
                     switch(position){  
                     case 0 :  
                          Toast.makeText(MainActivity.this, "Item 1 clicked", Toast.LENGTH_LONG).show();  
                          break;  
                            
                     case 1 :  
                          Toast.makeText(MainActivity.this, "Item 2 clicked", Toast.LENGTH_LONG).show();  
                          break;  
                            
                     case 2 :  
                          Toast.makeText(MainActivity.this, "Item 3 clicked", Toast.LENGTH_LONG).show();  
                          break;  
                            
                     case 3 :  
                          Toast.makeText(MainActivity.this, "Item 4 clicked", Toast.LENGTH_LONG).show();  
                          break;  
                            
                     case 4 :  
                          Toast.makeText(MainActivity.this, "Item 5 clicked", Toast.LENGTH_LONG).show();  
                          break;  
                            
                     case 5 :  
                          Toast.makeText(MainActivity.this, "Item 6 clicked", Toast.LENGTH_LONG).show();  
                          break;  
                            
                     case 6 :  
                          Toast.makeText(MainActivity.this, "Item 7 clicked", Toast.LENGTH_LONG).show();  
                          break;  
                            
                     case 7 :  
                          Toast.makeText(MainActivity.this, "Item 8 clicked", Toast.LENGTH_LONG).show();  
                          break;  
                     }  
                       
                }  
           });  
      }  
 }  


In the MainActivity.java we first bind the ListView from xml file by using findViewbyId() and than we need to define an Adapter.

Adapter is used to give the data to the list view, for that make a String array before which contains all the list items data. Now make an ArrayAdapter which takes 4 parameters in which first parameter is context, second parameter is the reference to the layout of list item ( in this example we are using android in build simple list view, so we pass simple list item from android.R.layout), the third parameter is used to give the id of the text view where each list item text will be set and in this example we give that id from in built android text id and the fourth parameter is the string array because we made a ArrayAdapter which is of type String.


And than just set the adapter in the list view. In this example we are also set up OnItemClickListener for the list view which listens whenever any item of the list view will be clicked.
Read more

Saturday 30 August 2014

Start Android Development with Simple Calculator Application


SIMPLE CALCULATOR APPLICATION :


In this post I will show you how to make a simple calculator android application which can only do four operations : add, subtract, divide and multiply.


Note : To make an android application you must know the basics of java otherwise it is too difficult to understand the concept of android.

This is a simple application to start with the android development. I am making this type of simple application so that you can easily start android development.

To start with android development first download the Android SDK plus Eclipse ADT and follow the options to setup all from the following link.


After successfully installing Eclipse, open your eclipse and give a workspace. Workspace is that where you want to save your android project in computer.

Now go to the file section of the eclipse and then go to “New” and then to “other”. You must get the following screen :


Now create new Android Application Project.

Than give a name as Simple calculator and then hit Next, next and create an empty activity.


You will get this type of directories :


Now open the src file where the source files of java are stored and than go to the MainActivity.java (this activity shows when you run the application) . 

Copy the code shown below in the MainActivity :

1:  package com.calci.simplecalculator;  
2:    
3:  import android.app.Activity;  
4:  import android.os.Bundle;  
5:  import android.view.View;  
6:  import android.widget.Button;  
7:  import android.widget.EditText;  
8:  import android.widget.TextView;  
9:  import android.widget.Toast;  
10:    
11:  public class MainActivity extends Activity {  
12:    
13:       EditText number1, number2;   
14:       TextView result;  
15:       Button addButton, subButton, mulButton, divButton;  
16:    @Override  
17:    protected void onCreate(Bundle savedInstanceState) {  
18:      super.onCreate(savedInstanceState);  
19:      setContentView(R.layout.activity_main);  
20:        
21:      //initialize variables  
22:      number1 = (EditText)findViewById(R.id.number1);  
23:      number2 = (EditText)findViewById(R.id.number2);  
24:      result = (TextView)findViewById(R.id.result);  
25:      addButton = (Button)findViewById(R.id.addButton);  
26:      subButton = (Button)findViewById(R.id.subButton);  
27:      mulButton = (Button)findViewById(R.id.mulButton);  
28:      divButton = (Button)findViewById(R.id.divButton);  
29:        
30:        
31:      //listener on add button  
32:      addButton.setOnClickListener(new View.OnClickListener() {  
33:                   
34:                 @Override  
35:                 public void onClick(View v) {  
36:                      // TODO Auto-generated method stub  
37:                      try{  
38:                           String n1 = number1.getText().toString();  
39:                           String n2 = number2.getText().toString();  
40:                           String sum = String.valueOf(((Integer.parseInt(n1)) + (Integer.parseInt(n2))));  
41:                           result.setText(sum + " (Sum)");  
42:                 }catch(Exception e){  
43:                      Toast.makeText(MainActivity.this, "Please enter two numbers to calculate the sum", Toast.LENGTH_LONG).show();  
44:                      e.printStackTrace();  
45:                 }  
46:                 }  
47:            });  
48:        
49:      //listener on sub button  
50:      subButton.setOnClickListener(new View.OnClickListener() {  
51:                   
52:           @Override  
53:                 public void onClick(View v) {  
54:                      // TODO Auto-generated method stub  
55:                      try{  
56:                           String n1 = number1.getText().toString();  
57:                           String n2 = number2.getText().toString();  
58:                           String sub = String.valueOf(((Integer.parseInt(n1)) - (Integer.parseInt(n2))));  
59:                           result.setText(sub + " (Subtraction)");  
60:                 }catch(Exception e){  
61:                      Toast.makeText(MainActivity.this, "Please enter two numbers to calculate the subtraction", Toast.LENGTH_LONG).show();  
62:                      e.printStackTrace();  
63:                 }  
64:                 }  
65:            });  
66:        
67:      //listener on mul button  
68:      mulButton.setOnClickListener(new View.OnClickListener() {  
69:                   
70:           @Override  
71:                 public void onClick(View v) {  
72:                      // TODO Auto-generated method stub  
73:                      try{  
74:                           String n1 = number1.getText().toString();  
75:                           String n2 = number2.getText().toString();  
76:                           String mul = String.valueOf(((Integer.parseInt(n1)) * (Integer.parseInt(n2))));  
77:                           result.setText(mul + " (Multiplication)");  
78:                 }catch(Exception e){  
79:                      Toast.makeText(MainActivity.this, "Please enter two numbers to calculate the multiplication", Toast.LENGTH_LONG).show();  
80:                      e.printStackTrace();  
81:                 }  
82:                 }  
83:            });  
84:        
85:      //listener on div button  
86:      divButton.setOnClickListener(new View.OnClickListener() {  
87:                   
88:           @Override  
89:                 public void onClick(View v) {  
90:                      // TODO Auto-generated method stub  
91:                      try{  
92:                           String n1 = number1.getText().toString();  
93:                           String n2 = number2.getText().toString();  
94:                           String div = String.valueOf(((Integer.parseInt(n1)) / (Integer.parseInt(n2))));  
95:                           result.setText(div + " (Division)");  
96:                 }catch(Exception e){  
97:                      Toast.makeText(MainActivity.this, "Please enter two numbers to calculate the division", Toast.LENGTH_LONG).show();  
98:                      e.printStackTrace();  
99:                 }  
100:                 }  
101:            });  
102:    }  
103:    
104:         
105:      
106:      
107:  }  
108:    


You will get the errors with red lines when the button and edit texts are mapped from xml file to java file because we do not have buttons and edit texts in xml file till now.

In this source file we set the onClickListener on the add, sub, mul and div buttons. The whole logic is that we get the number entered by user when the user presses any button in the application and than these numbers will be added, subtracted, divide or multiply according to the button clicked by the user.

Now coming to the designing part i.e., xml file. 
Go to the res folder than go to layout and open the file named as “activity_main.xml”. Copy the following code in the xml in which we give the ids of buttons and edit texts (in “android:id=”@+id/idname” statement of any object like button and edit text)which will mapped in the java source file. When you save xml file you can see all the errors are removed in the java file.

1:  <LinearLayout xmlns:android="http://schemas.android.com/apk/res/android"  
2:    xmlns:tools="http://schemas.android.com/tools"  
3:    android:layout_width="match_parent"  
4:    android:layout_height="match_parent"  
5:    android:orientation="vertical"  
6:     >  
7:    
8:    <TextView   
9:      android:layout_width="wrap_content"  
10:      android:layout_height="wrap_content"  
11:      android:text="SIMPLE CALCULATOR"  
12:      android:textSize="20sp"  
13:      android:layout_gravity="center"  
14:      />  
15:    <LinearLayout   
16:      android:layout_width="fill_parent"  
17:      android:layout_height="wrap_content"  
18:      android:orientation="horizontal"  
19:      android:layout_marginTop="5dp"  
20:      >  
21:    <TextView   
22:      android:layout_width="wrap_content"  
23:      android:layout_height="wrap_content"  
24:      android:text="Number 1"  
25:      android:layout_gravity="center"  
26:      android:layout_marginLeft="10dp"  
27:      android:textSize="18sp"  
28:      />  
29:    <EditText  
30:      android:id="@+id/number1"  
31:      android:layout_width="wrap_content"  
32:      android:layout_height="wrap_content"  
33:      android:layout_marginLeft="4dp"  
34:      android:ems="10"  
35:      android:inputType="number" >  
36:    
37:        
38:    </EditText>  
39:  </LinearLayout>  
40:    <LinearLayout   
41:      android:layout_width="fill_parent"  
42:      android:layout_height="wrap_content"  
43:      android:orientation="horizontal"  
44:      android:layout_marginTop="5dp"  
45:      >  
46:    <TextView   
47:      android:layout_width="wrap_content"  
48:      android:layout_height="wrap_content"  
49:      android:text="Number 2"  
50:      android:layout_gravity="center"  
51:      android:layout_marginLeft="10dp"  
52:      android:textSize="18sp"  
53:      />  
54:    <EditText  
55:      android:id="@+id/number2"  
56:      android:layout_width="wrap_content"  
57:      android:layout_height="wrap_content"  
58:      android:layout_marginLeft="4dp"  
59:      android:ems="10"  
60:      android:inputType="number" >  
61:    
62:        
63:    </EditText>  
64:  </LinearLayout>  
65:    <LinearLayout   
66:      android:layout_width="fill_parent"  
67:      android:layout_height="wrap_content"  
68:      android:orientation="horizontal"  
69:      android:layout_marginTop="5dp"  
70:      >  
71:    <TextView   
72:      android:layout_width="wrap_content"  
73:      android:layout_height="wrap_content"  
74:      android:text="Result : "  
75:      android:layout_gravity="center"  
76:      android:layout_marginLeft="10dp"  
77:      android:textSize="18sp"  
78:      />  
79:    <TextView  
80:      android:id="@+id/result"  
81:      android:layout_width="wrap_content"  
82:      android:layout_height="wrap_content"  
83:      android:layout_marginLeft="10dp"  
84:      android:layout_gravity="center"  
85:      android:textSize="18sp"  
86:      >  
87:    
88:        
89:    </TextView>  
90:  </LinearLayout>  
91:  <LinearLayout   
92:      android:layout_width="fill_parent"  
93:      android:layout_height="wrap_content"  
94:      android:orientation="horizontal"  
95:      android:layout_marginTop="5dp"  
96:      android:weightSum="1"  
97:      >  
98:    <Button  
99:      android:id="@+id/addButton"  
100:      android:layout_weight="0.5"  
101:      style="?android:attr/buttonStyleSmall"  
102:      android:layout_width="fill_parent"  
103:      android:layout_height="wrap_content"  
104:      android:layout_gravity="center"  
105:      android:layout_marginTop="10dp"  
106:      android:text="ADD" />  
107:      
108:    <Button  
109:      android:id="@+id/subButton"  
110:      android:layout_weight="0.5"  
111:      style="?android:attr/buttonStyleSmall"  
112:      android:layout_width="fill_parent"  
113:      android:layout_height="wrap_content"  
114:      android:layout_gravity="center"  
115:      android:layout_marginTop="10dp"  
116:      android:text="SUBTRACT" />  
117:    </LinearLayout>  
118:    
119:  <LinearLayout   
120:      android:layout_width="fill_parent"  
121:      android:layout_height="wrap_content"  
122:      android:orientation="horizontal"  
123:      android:layout_marginTop="5dp"  
124:      android:weightSum="1"  
125:      >  
126:    <Button  
127:      android:id="@+id/mulButton"  
128:      android:layout_weight="0.5"  
129:      style="?android:attr/buttonStyleSmall"  
130:      android:layout_width="fill_parent"  
131:      android:layout_height="wrap_content"  
132:      android:layout_gravity="center"  
133:      android:layout_marginTop="10dp"  
134:      android:text="MULTIPLY" />  
135:      
136:    <Button  
137:      android:id="@+id/divButton"  
138:      android:layout_weight="0.5"  
139:      style="?android:attr/buttonStyleSmall"  
140:      android:layout_width="fill_parent"  
141:      android:layout_height="wrap_content"  
142:      android:layout_gravity="center"  
143:      android:layout_marginTop="10dp"  
144:      android:text="DIVIDE" />  
145:    </LinearLayout>  
146:    
147:  </LinearLayout>  


Xml file is used for the designing purposes in the android application development and java file is used for implementing the business logic.


Now for running the application, right click on the project in the package explorer and go to “Run as” and than “1 android application”. You will be asked to create the emulator if you don’t have before than just create the emulator and run this application. Enjoy your first calculator application in android.
Read more

Difference between Overloading and Overriding in Java


OVERLOADING :

In java it is possible to define two or more methods within the same class that share the same name as long as their parameter declaration (i.e. signature) are different which is called overloading.

Overloading is basically means that you use the same name of function with different signatures.

Java run time environment will check the parameters of a function at run time whenever that method is called by the object and bind according to the signatures.

To understand the concept consider the below program :


1:  class CircleArea  
2:  {  
3:       private double getArea(double radius)  
4:       {  
5:            double area = 3.145 * radius * radius;  
6:            System.out.println("Area is : "+area);  
7:            return area;  
8:       }  
9:    
10:         
11:       private float getArea(float radius)  
12:       {  
13:            float area = 3.145f * radius * radius;  
14:            System.out.println("Area is : "+area);  
15:            return area;  
16:       }  
17:    
18:       private int getArea(int radius)  
19:       {  
20:            int area = 3 * radius * radius;  
21:            System.out.println("Area is : "+area);  
22:            return area;  
23:       }  
24:    
25:       public static void main(String[] args)  
26:       {  
27:            CircleArea cir = new CircleArea();  
28:            cir.getArea(25.1452); //call the first method which is double type  
29:            cir.getArea(25.1452f); //call the second method which is float type  
30:            cir.getArea(25); //call the int type method  
31:       }  
32:  }  

Output :


In the above program same function getArea is implemented three times with different signatures like in first we passed double parameter, in second we passed float parameter and in last implementation we passed int parameter and return types of these methods are also different.


These functions are called by java run time environment only when we pass parameter according to the data type.

OVERRIDING :

Extending the method of a parent class by adding more functionality to its child class method is known as overriding.

In method overriding the signature and name must be same. The new method which is again implemented in the child class is called overridden method.

Consider following example :

1:  class A  
2:  {  
3:       public int operation(int a, int b)  
4:       {  
5:            int c = a + b;  
6:            return c;  
7:       }  
8:  }  
9:    
10:  class B extends A  
11:  {  
12:       //same method as in A class but the implementation is different  
13:       public int operation(int a, int b)  
14:       {  
15:            int c = a - b;  
16:            return c;  
17:       }  
18:  }  


In the above example you can easily understand that the method in class B has same name and signature but the implementation is different than A class.


Note : 
You can only override methods in the child class not in the same class.

Now consider a diagram by which you can easily understand the difference between the two :


Therefore, it is clear that overloading is done by using same name with different signatures in the same class whereas overriding is done with the use of same name, signature and different implementation in the child class.

Read more

#2 Star Pattern Program in Java


In the program the following star pattern will be printed.


At first, we get the number where we want to print the star pattern from the user with the use of Scanner class and store that number in variable n then we make a loop which starts from 0 till n-1.

Inside of that loop there is another loop which is used for giving spaces from left side equal to the line number.

There is one more loop inside the first loop which takes values from 0 to n-1 and used for printing stars and then there is a println statement which is used for going to the next line. 

The program is shown below :

1:  import java.util.Scanner;  
2:    
3:  class StarPattern2  
4:  {  
5:       public static void main(String[] args)  
6:       {  
7:            int n;  
8:            System.out.println("Enter the number till you want a star pattern");  
9:            Scanner scan = new Scanner(System.in);  
10:            n = scan.nextInt();  
11:    
12:            label:     for(int i=0; i<n; i++)  
13:                 {  
14:                      for(int k=i; k>0; k--)  
15:                      {  
16:                           System.out.print(" ");  
17:                      }  
18:                      for(int j=0; j<n-i; j++)  
19:                      {  
20:                           System.out.print("*");  
21:                      }  
22:                      //for jump to next line  
23:                      System.out.println("");  
24:                 }  
25:       }  
26:  }  

Output :


Read more

Friday 29 August 2014

#1 Star Pattern Program in Java


In the program the following star pattern will be printed.

At first, we get the number where we want to print the star pattern from the user with the use of Scanner class and store that number in variable n then we make a loop which starts from 0 till n-1.


Inside of that loop there is another loop from 0 to n-1 and we jump from the inner loop if we get a number greater than the outer loop value with the use of continue because we only want stars equal to outer loops in a single line.

The program is shown below :

1:  import java.util.Scanner;  
2:    
3:  class StarPattern1  
4:  {  
5:       public static void main(String[] args)  
6:       {  
7:            int n;  
8:            System.out.println("Enter the number till you want a star pattern");  
9:            Scanner scan = new Scanner(System.in);  
10:            n = scan.nextInt();  
11:    
12:            label:     for(int i=0; i<n; i++)  
13:                 {  
14:                      for(int j=0; j<n; j++)  
15:                      {  
16:                           if(j>i)  
17:                           {  
18:                                System.out.println();  
19:                                continue label;  
20:                           }  
21:                           else  
22:                           {  
23:                                System.out.print("*");  
24:                           }  
25:                      }  
26:                 }  
27:       }  
28:  }  

Output :


Read more

Fibonacci Series Program in Java


Fibonacci Series Definition :

Fibonacci series is something like this :
0, 1, 1, 2, 3, 5, 8, 13, 21, 34…….

In this series each term is calculated by adding the previous two terms where the first two terms are 0 and 1.

For example :
Third term = first term + second term = 0 + 1 = 1
Fourth term = second term + third term = 1 + 1 = 2
Fifth term = third term + fourth term = 1 + 2 = 3
And so on……

If we represent this series in Fn than :
F0 = 0
F1 = 1
F2 = F0 + F1
Or in General

Fn = Fn-1 + Fn-2 where n>= 2

Program By using Iteration :

1:  import java.util.Scanner;  
2:    
3:  class FibonacciSeries  
4:  {  
5:    
6:       private void fibonacciSeries(int n)  
7:       {  
8:            int a = 0; //first variable  
9:            int b = 1; //second variable  
10:            int sum;  
11:            System.out.println("The Fibonacci Series is ");  
12:            System.out.print(""+a+" "+b);  
13:            for(int i=1; i<n; i++)  
14:            {  
15:                 sum = a + b;  
16:                 //Here next term which is the sum of previous two is printed  
17:                 System.out.print(" "+sum);  
18:                   
19:                 //first variable takes value of second variable  
20:                 a = b;  
21:                 //second variable takes sum of previous two  
22:                 b = sum;  
23:            }  
24:       }  
25:    
26:       public static void main(String[] args)  
27:       {  
28:              
29:            System.out.println("Enter the no. till you want fibonacci series");  
30:    
31:            Scanner scan = new Scanner(System.in);  
32:            int n = scan.nextInt();  
33:              
34:            //if we have only single term  
35:            if(n==0)  
36:            {  
37:                 System.out.println("The fibonacci Series is \n0");  
38:            }  
39:            //If we want to show two terms  
40:            else if(n==1)  
41:            {  
42:                 System.out.println("The fibonacci Series is \n0 1");  
43:            }  
44:            else  
45:            {  
46:                 FibonacciSeries obj = new FibonacciSeries();  
47:                 obj.fibonacciSeries(n);  
48:            }  
49:              
50:       }  
51:  }  


In the above program we stored the first two terms of the Fibonacci series which are 0 and 1 in two variables (a and b) and print the same if the series you want to calculate is greater than 2.

This program also checks if we want only 1 term or 2 terms in the series and just print the value of variables a or both a and b respectively.


If the series is longer than 2 terms than in the for loop the sum of two variables are calculated and used as a next term which further will be stored in second variable (i.e. b) and second variable value is stored in first variable (i.e. a).

Output :


Program by using Recursion :

Recursion means you called a method from the same method. It basically implemented by the use of stacks.

1:  import java.util.Scanner;  
2:    
3:  public class FibonacciSeriesWithRecursion  
4:  {  
5:       public static void main(String[] args)   
6:       {  
7:            Scanner s = new Scanner(System.in);  
8:           System.out.print("Enter the no. till you want fibonacci series");  
9:                  
10:            //Get the number of terms and stored in variable n  
11:            int n = s.nextInt();  
12:    
13:            FibonacciSeriesWithRecursion obj = new FibonacciSeriesWithRecursion();  
14:                for (int i = 0; i <= n; i++)   
15:            {  
16:                  System.out.print(obj.fibonacci(i) + " ");  
17:                }  
18:         }  
19:    
20:         private int fibonacci(int n)   
21:       {  
22:                if (n == 0)   
23:            {  
24:                  return 0;  
25:                }   
26:            else if (n == 1)   
27:            {  
28:                  return 1;  
29:                }   
30:            else   
31:            {  
32:                 //calling itself with different arguments known as recursion  
33:                  return fibonacci(n - 1) + fibonacci(n - 2);  
34:                }  
35:         }  
36:  }  
37:    


In the above program we uses a method fibonacci which takes the term of series as argument and calculates the sum of previous two terms by calling itself with previous two terms arguments again and again.

Output :


Read more